Building Android App
Create a new project in Android Studio, choosing a minimum API level of 18 and adding a Empty Activity.
Add a permission to access the internet to AndroidManifest.xml inside the
application tag:<uses-permission android:name="android.permission.INTERNET"/>
Add the library dependencies to the dependencies section of the build.gradle (Module: app) file:
    compile 'com.squareup.okhttp3:logging-interceptor:3.4.0'
    compile 'com.squareup.retrofit2:retrofit:2.1.0'
    compile 'com.squareup.retrofit2:converter-gson:2.1.0'
    compile 'com.squareup:otto:1.3.8'
    compile 'com.google.code.gson:gson:2.6.2'
Creating login layout
The only layout needed for this application is activity_main.xml, change it to the below:
<?xml version="1.0" encoding="utf-8"?>
<RelativeLayout xmlns:android="http://schemas.android.com/apk/res/android"
    xmlns:tools="http://schemas.android.com/tools"
    android:layout_width="match_parent"
    android:layout_height="match_parent"
    android:paddingBottom="@dimen/activity_vertical_margin"
    android:paddingLeft="@dimen/activity_horizontal_margin"
    android:paddingRight="@dimen/activity_horizontal_margin"
    android:paddingTop="@dimen/activity_vertical_margin"
    tools:context="com.example.theodhorpandeli.retrofit.MainActivity">

    <LinearLayout
        android:layout_width="match_parent"
        android:layout_height="wrap_content"
        android:orientation="vertical"
        android:id="@+id/loginLayout">

            <EditText
                android:layout_width="match_parent"
                android:layout_height="wrap_content"
                android:id="@+id/usernameInput"
                android:hint="Username:"/>

            <EditText
                android:layout_width="match_parent"
                android:layout_height="wrap_content"
                android:id="@+id/passwordInput"
                android:hint="Password:"/>

        <LinearLayout
            android:layout_width="match_parent"
            android:layout_height="wrap_content"
            android:orientation="horizontal">

            <Button
                android:layout_width="wrap_content"
                android:layout_height="wrap_content"
                android:id="@+id/loginButtonPost"
                android:text="Login - Post"
                android:layout_gravity="right"
                android:layout_weight="1" />

            <Button
                android:layout_width="wrap_content"
                android:layout_height="wrap_content"
                android:id="@+id/loginButtonGet"
                android:text="Login - Get"
                android:layout_weight="1" />

        </LinearLayout>

    </LinearLayout>

    <LinearLayout
        android:orientation="vertical"
        android:layout_width="match_parent"
        android:layout_height="fill_parent"
        android:layout_below="@id/loginLayout">

        <TextView
            android:layout_width="wrap_content"
            android:layout_height="wrap_content"
            android:id="@+id/information"
            android:layout_gravity="center_horizontal"
            android:layout_marginTop="20dp" />

        <TextView
            android:layout_width="wrap_content"
            android:layout_height="wrap_content"
            android:id="@+id/extraInformation"
            android:layout_gravity="center_horizontal"
            android:layout_marginTop="20dp" />
    </LinearLayout>

</RelativeLayout>
The layout includes two
EditText elements (username and password), two Buttons and two TextViews to show the server response.Creating Classes
To send data to the server, Retrofit uses a
Communicator and an Interface class. The Communicator methods create RestAdapters that use the Interfaces to perform a server request.
To create the Interface Class, right-click on the main package and select New -> Java Class. Call this class Interface and select Kind -> Interface.
This class contains the methods which will communicate with the API. First adding the methods for POST requests.
public interface Interface {

    //This method is used for "POST"
    @FormUrlEncoded
    @POST("/api.php")
    Call<ServerResponse> post(
            @Field("method") String method,
            @Field("username") String username,
            @Field("password") String password
    );

  //This method is used for "GET"
    @GET("/api.php")
    Call<ServerResponse> get(
            @Query("method") String method,
            @Query("username") String username,
            @Query("password") String password
    );

}
Three variables are sent to the API encoded as form data. You will build the
ServerResponse class later, so don’t worry about any errors you might see.
The
Communicator class performs the call and contains the methods which create the Rest Adapter.
Create a new class called
Communicator and add this code:public class Communicator {
private static final String TAG = "Communicator";
private static final String SERVER_URL = "http://127.0.0.1/retrofit";
public void loginPost(String username, String password){
//Here a logging interceptor is created
HttpLoggingInterceptor logging = new HttpLoggingInterceptor();
logging.setLevel(HttpLoggingInterceptor.Level.BODY);
//The logging interceptor will be added to the http client
OkHttpClient.Builder httpClient = new OkHttpClient.Builder();
httpClient.addInterceptor(logging);
//The Retrofit builder will have the client attached, in order to get connection logs
Retrofit retrofit = new Retrofit.Builder()
.client(httpClient.build())
.addConverterFactory(GsonConverterFactory.create())
.baseUrl(SERVER_URL)
.build(); Interface service = retrofit.create(Interface.class);
Call<ServerResponse> call = service.post("login",username,password);
call.enqueue(new Callback<ServerResponse>() {
@Override
public void onResponse(Call<ServerResponse> call, Response<ServerResponse> response) {
BusProvider.getInstance().post(new ServerEvent(response.body()));
Log.e(TAG,"Success");
}
@Override
public void onFailure(Call<ServerResponse> call, Throwable t) {
// handle execution failures like no internet connectivity
BusProvider.getInstance().post(new ErrorEvent(-2,t.getMessage()));
}
});
}
public void loginGet(String username, String password){
//Here a logging interceptor is created
HttpLoggingInterceptor logging = new HttpLoggingInterceptor();
logging.setLevel(HttpLoggingInterceptor.Level.BODY);
//The logging interceptor will be added to the http client
OkHttpClient.Builder httpClient = new OkHttpClient.Builder();
httpClient.addInterceptor(logging);
//The Retrofit builder will have the client attached, in order to get connection logs
Retrofit retrofit = new Retrofit.Builder()
.client(httpClient.build())
.addConverterFactory(GsonConverterFactory.create())
.baseUrl(SERVER_URL)
.build();
Interface service = retrofit.create(Interface.class);
Call<ServerResponse> call = service.get("login",username,password);
call.enqueue(new Callback<ServerResponse>() {
@Override
public void onResponse(Call<ServerResponse> call, Response<ServerResponse> response) {
BusProvider.getInstance().post(new ServerEvent(response.body()));
Log.e(TAG,"Success");
}
@Override
public void onFailure(Call<ServerResponse> call, Throwable t) {
// handle execution failures like no internet connectivity
BusProvider.getInstance().post(new ErrorEvent(-2,t.getMessage()));
}
});
}
Change
SERVER_URL to the URL of your PHP server, I won’t cover setting up PHP in this tutorial, but you can find comprehensive instructions here.
Create a new class called
BusProvider and add the following code:public class BusProvider {
private static final Bus BUS = new Bus();
public static Bus getInstance(){
return BUS;
}
public BusProvider(){}
}
In the
MainActivity class, get the values from the EditText elements and use them as parameters to the server call. Change the MainActivity class to:public class MainActivity extends AppCompatActivity {
private Communicator communicator;
private String username, password;
private EditText usernameET, passwordET;
private Button loginButtonPost, loginButtonGet;
private TextView information, extraInformation;
private final static String TAG = "MainActivity";
public static Bus bus;
@Override
protected void onCreate(Bundle savedInstanceState) {
super.onCreate(savedInstanceState);
setContentView(R.layout.activity_main);
communicator = new Communicator();
usernameET = (EditText)findViewById(R.id.usernameInput);
passwordET = (EditText)findViewById(R.id.passwordInput);
//This is used to hide the password's EditText characters. So we can avoid the different hint font.
passwordET.setTransformationMethod(new PasswordTransformationMethod());
loginButtonPost = (Button)findViewById(R.id.loginButtonPost);
loginButtonPost.setOnClickListener(new View.OnClickListener() {
@Override
public void onClick(View v) {
username = usernameET.getText().toString();
password = passwordET.getText().toString();
usePost(username, password);
}
});
loginButtonGet = (Button)findViewById(R.id.loginButtonGet);
loginButtonGet.setOnClickListener(new View.OnClickListener() {
@Override
public void onClick(View v) {
username = usernameET.getText().toString();
password = passwordET.getText().toString();
useGet(username, password);
}
});
information = (TextView)findViewById(R.id.information);
extraInformation = (TextView)findViewById(R.id.extraInformation);
}
private void usePost(String username, String password){
communicator.loginPost(username, password);
}
private void useGet(String username, String password){
communicator.loginGet(username, password);
}
}
Recapping what you have done so far. The values of the
EditText elements are passed to the usePost() method. Then the communicator method is called and uses these values to create its Rest Adapter and perform the call.
Now that the posting method is almost complete, the application should handle responses from the server. For this, Retrofit uses classes called
Model. For this application, the Model’s name is ServerResponse and is called inside the Interface’s method as a Callback, and when the RestAdapter is created. In both cases, it specifies the type of response expected from the server.
Create a new class called
ServerResponse and add the code below:public class ServerResponse {
public class ServerResponse implements Serializable {
@SerializedName("returned_username")
private String username;
@SerializedName("returned_password")
private String password;
@SerializedName("message")
private String message;
@SerializedName("response_code")
private int responseCode;
public ServerResponse(String username, String password, String message, int responseCode){
this.username = username;
this.password = password;
this.message = message;
this.responseCode = responseCode;
}
public String getUsername() {
return username;
}
public void setUsername(String username) {
this.username = username;
}
public String getPassword() {
return password;
}
public void setPassword(String password) {
this.password = password;
}
public String getMessage() {
return message;
}
public void setMessage(String message) {
this.message = message;
}
public int getResponseCode() {
return responseCode;
}
public void setResponseCode(int responseCode) {
this.responseCode = responseCode;
}
}
}
Retrofit’s models usually implement
Serializable because they need to parse data from objects, in this case, from a JSONObject. This class declares variables, coupled with the name of the JSON key, whose data they handle.
To show the server responses, Retrofit uses ‘Events’. To get the server response, you need to create event classes. Create a new class called
ServerEvent.public class ServerEvent {
private ServerResponse serverResponse;
public ServerEvent(ServerResponse serverResponse) {
this.serverResponse = serverResponse;
}
public ServerResponse getServerResponse() {
return serverResponse;
}
public void setServerResponse(ServerResponse serverResponse) {
this.serverResponse = serverResponse;
}
}
When called, this class constructs a
ServerResponse.
Create another class called
ErrorEvent and add the following code:public class ErrorEvent {
private int errorCode;
private String errorMsg;
public ErrorEvent(int errorCode, String errorMsg) {
this.errorCode = errorCode;
this.errorMsg = errorMsg;
}
public int getErrorCode() {
return errorCode;
}
public void setErrorCode(int errorCode) {
this.errorCode = errorCode;
}
public String getErrorMsg() {
return errorMsg;
}
public void setErrorMsg(String errorMsg) {
this.errorMsg = errorMsg;
}
}
These methods get more information about the server response or any errors. For this sample app, the
Event classes are created but not used. Add these methods to the Communicator class, before the closing bracket:...
@Produce
public ServerEvent produceServerEvent(ServerResponse serverResponse) {
return new ServerEvent(serverResponse);
}
@Produce
public ErrorEvent produceErrorEvent(int errorCode, String errorMsg) {
return new ErrorEvent(errorCode, errorMsg);
}
...
The
RestAdapter is now complete, the most important part of the code is:...
Call<ServerResponse> call = service.post("login",username,password);
call.enqueue(new Callback<ServerResponse>() {
@Override
public void onResponse(Call<ServerResponse> call, Response<ServerResponse> response) {
// response.isSuccessful() is true if the response code is 2xx
BusProvider.getInstance().post(new ServerEvent(response.body()));
Log.e(TAG,"Success");
}
@Override
public void onFailure(Call<ServerResponse> call, Throwable t) {
// handle execution failures like no internet connectivity
BusProvider.getInstance().post(new ErrorEvent(-2,t.getMessage()));
}
});
...
This specifies that the callback will have a
ServerResponse structure and implements two overridden methods, successand failure. The first method is called when the client gets a response from the server and the second when the server is not found or when a connection error occurs.
Retrofit uses
BusProvider to get data from the server whenever the success or failure method is called. A BusProvider is like a channel where every response is passed. Depending on the case, BusProvider posts a ServerEvent, from where you can get the desired data or an ErrorEvent which contains error information.
At one end of the channel is the
Retrofit Builder which pushes the response data, and at the other, any activity which waits for data.
To make the
MainActivity class wait for an event, first, you need to implement two methods. Add the following to the class:@Override
public void onResume(){
super.onResume();
BusProvider.getInstance().register(this);
}
@Override
public void onPause(){
super.onPause();
BusProvider.getInstance().unregister(this);
}
This causes the activity to wait for an event by registering it to the Event Bus, now the event needs to be caught. Since you built two types of event,
ServerEvent and ErrorEvent, they both need to be caught by implementing two Subscribedmethods. Add the following methods to MainActivity:@Subscribe
public void onServerEvent(ServerEvent serverEvent){
Toast.makeText(this, ""+serverEvent.getServerResponse().getMessage(), Toast.LENGTH_SHORT).show();
if(serverEvent.getServerResponse().getUsername() != null){
information.setText("Username: "+serverEvent.getServerResponse().getUsername() + " || Password: "+serverEvent.getServerResponse().getPassword());
}
extraInformation.setText("" + serverEvent.getServerResponse().getMessage());
}
@Subscribe
public void onErrorEvent(ErrorEvent errorEvent){
Toast.makeText(this,""+errorEvent.getErrorMsg(),Toast.LENGTH_SHORT).show();
}
Now the class is subscribed to the events provided by the Bus and depending on the type of Event, the user receives information.
Server side
PHP Script
For this sample app, the server consists of a simple PHP script. For simplicity, this script is not connected to a database. Create api.php and add the following:
<?php
//Post Method here
if(isset($_POST['method']) == 'login'){
$username = $_POST['username'];
$password = $_POST['password'];
if($username == "admin" && $password == "admin"){
$response = array('returned_username' => "-admin-",
'returned_password' => "-admin-",
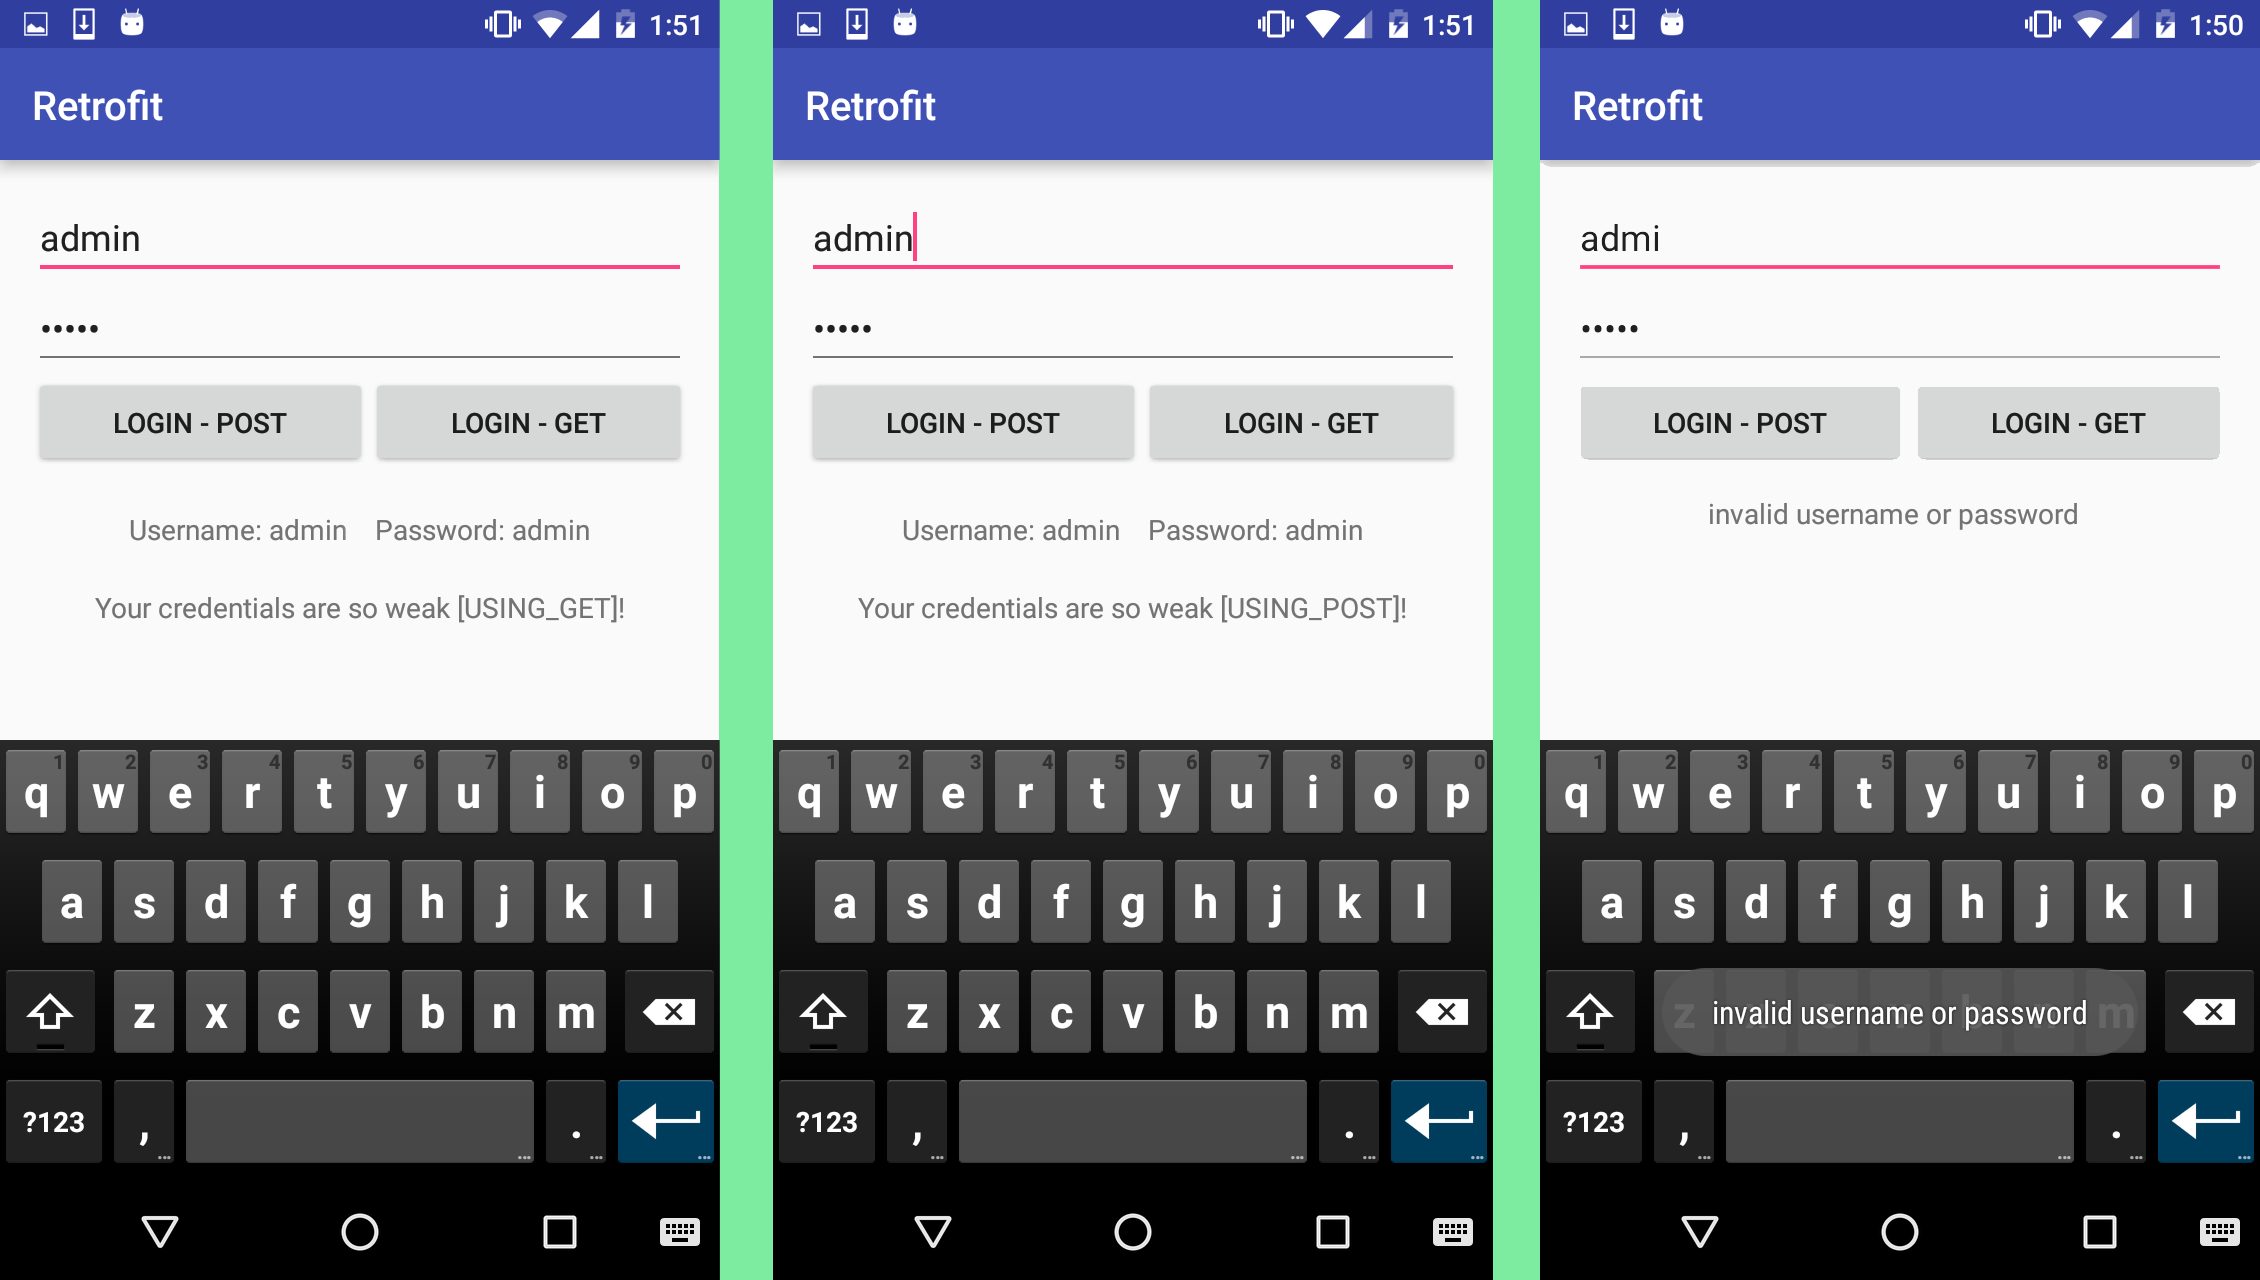
'message' => "Your credentials are so weak [USING_POST]!",
'response_code' => "1");
echo json_encode($response);
}else{
$response = array('response_code' => "-1",
'message' => "invalid username or password");
echo json_encode($response);
}
}
The first part gets parameters from the
POST method and if they are as expected, the statement is true and a JSON response sent back to the client. If the statement is not true, a JSON error message response is sent back to the client.
The second part is almost the same as the first, but the parameters are sent using the
GET method. The response options are the same. If none of the methods are used, a general response with an error code is generated as a JSON Object.
Add the following to your PHP file:
//Get Method here
else if(isset($_GET['method']) == 'login'){
    $username = $_GET['username'];
    $password = $_GET['password'];

    if($username == "admin" && $password == "admin"){
        $response = array('returned_username' => "=admin=",
                          'returned_password' => "=admin=",
                          'message' => "Your credentials are so weak [USING_GET]!",
                          'response_code' => "1");
             echo json_encode($response);
    }else{
        $response = array('response_code' => "-1",
                          'message' => "invalid username or password");
           echo json_encode($response);
    }
}

//If no method
else{
        $response = array('response_code' => "-2",
        'message' => "invalid method");
             echo json_encode($response);
}
?>
Start your PHP server and the Android app. You should get the following results depending on what you type into the text fields and which button you tap.
No comments:
Post a Comment